Showing posts with label DIY. Show all posts

Tuesday, August 26, 2014

Patterned Curtains using canvas drop cloths and acrylic paint


 Hey guys, it's been a while since I've posted a DIY blog. I've been involved in several projects for my livingroom this summer and I'm eager to share this one with you!

So I have this extremely big sliding glass door and have spent several years trying to find the perfect curtains to go on it. Because it's so hot here, I try and get sun blocking curtains. But, as anyone else can attest to, those are not the "pretty" curtains you want to use to accent your home.

Last summer on a whim, I decided to buy the pre-packaged canvas dropcloths from Home Depot. They come with one side already pre-hemmed so they are no-sew. I cut them down the middle and then hot glued a hem at the top for the pole to go through. I'm telling you, hot glue is my best friend.

We have loved them and they have kept out that hot sun in our home, but their canvas color makes our white walls look, well pretty drab. I have spent months just staring at them, trying to come up with a solution. I have spent countless hours scouring pinterest, to no avail. I wanted some kind of pattern on them, but everything on pinterest seemed very complicated and I was terrified of messing up.

One day at Michaels I happened upon a Fleur De Lis stencil on clearance. I have always loved a bit of french charm and took a big leap and bought it and some wine colored acrylic paint. I bought 4 bottles of it. I spread out that curtain and measured (ok I somewhat eye-balled it) how I wanted to pattern to look and commenced painting. It took me a couple of hours.


This is the rough shot of what it looked like when I was half way finished. I think the hardest part of the project was replicating the same pattern on the second half of the curtain. It took some effort.


                           But this was the end result and I couldn't be more thrilled with it.


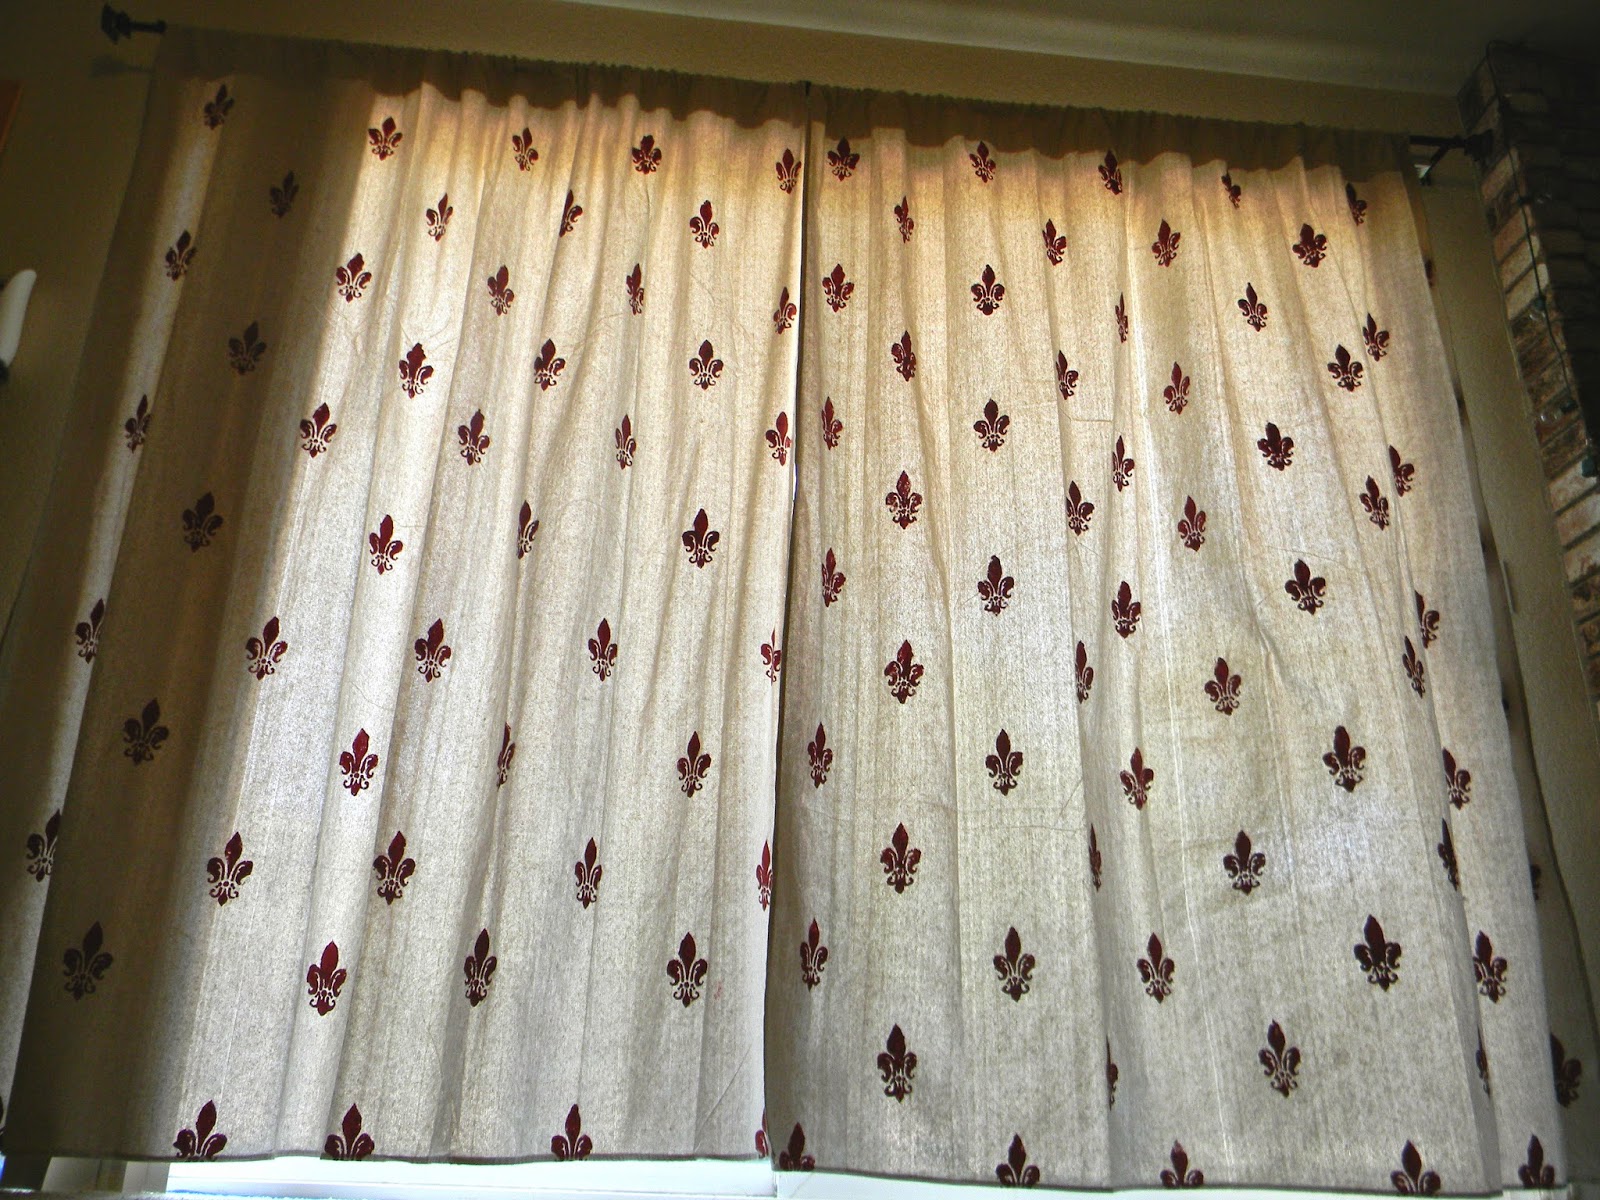
There were definitely splotches occasionally and each time I painted it, it always came out a little differently. But I actually like that they looked a bit different. It didn't seem like something I bought at Pottery Barn. It felt handmade; organic and a little retro.


In total, I spent $15 on the dropcloth, $5 on the stencil and $8 on the paint to make curtains that spanned the entire length of a very large wall. $28 isn't bad, and it's fun to know that I made them myself.

Can't wait to share my new office with you guys soon! For more DIY tutorials check out my DIY link at the top of the screen. I love to meet new friends, hit me up on Pinterest.

Like what you see? Pin it for later:


post signature

Wednesday, July 2, 2014

Our vow renewal: 10 years and still in love

I know that there have been a lot of naysayers out there about vow renewals. I realize that being married for 10 years is nothing in the grand scheme of forever after. But for our vow renewal, it wasn't really about having a new "wedding" although there were many things we did differently. It wasn't even about starting over, it was about acknowledging that ten years later, after a lot of life lived in a short amount of time, that we still genuinely love (and like) each other.

It was also about strengthening the commitment we made to each other when we hadn't really experienced the bumps and bruises of life. When we couldn't even possibly understand the promises we were making to each other, or how they would be tested. In Ten short years we have had a whole lot of life come crashing down on us and still, with God's help, we have remained united. This day among family and friends was a reminder of that.


Our kids were also a huge part of the equation. They have asked us so many times to recount our wedding. We felt that it was important for them to see that we are in love, that we are committed to one another and to our family. We tried to include them in every way we knew how. Making sure that they understood how valuable their presence was and the reasoning behind it.


We had them each walk us down the aisle and then walk back with us when it was all finished. We wanted them to know that this was also about them.


We have always loved the charm of the Diestelhorst Bridge in Redding and originally wanted it to be the charming backdrop to our festivities. When the opportunity came up, we rented the bridge out so that we could seal our vows at sunset with this being our view.
The theme was rustic charm, and there was lots of it on the bridge. We had white painted shutters as the "alter" and a burlap wreath along with lanterns and white flowers for added charm.


We said our vows in front of a small group of close family and friends as the sun was setting and were blessed by them also making the commitment to pray for and encourage us in our marriage.
 And they all prayed for us, which, if you have ever experienced is overwhelming. We felt very loved.

We wanted to remember everyone who came, so we had them each frame themselves overlooking the river.


And the consensus was made that we pretty much have the goofiest and most fun family and friends ever.


After that... it was time to party. And party we did. We moved to the end of the bridge where our rustic reception was awaiting us. Complete with down home treats and a Smores bar! I enjoyed crafting many of the items used for the renewal and especially took an interest in the chalk marker typography used for the menu. Super fun! And my dear friend Corrie comissioned her husband to make some awesome rustic crates for the event out of pallets.

And, of course, we included bugspray because when you're on the river you can't go without!


We also created a little snapshot scavenger hunt to encourage guests to snap pictures we might have missed.


We never got to have a first dance the first time around, so it was fun to have one this time. We had fun making a spotify playlist of music for the reception together. It kept the party lively.


As the sun began to retreat into the mountains, the party took on a new romantic glow. With a breathtaking view like that it was the perfect setting for slow dancing.


We also let our 6-year-old son have a camera to give his own perspective of the ceremony. I was amazed when I looked at them just what it was that he saw. Here are a few of my favorites:


It was magical. And then it came to a close. We loved every minute of it and were so happy that we were able to celebrate with the ones we love. I enjoyed sharing this with you as it was a labor of 6 months of hot glue, paint, and love. I hope you enjoyed it as well.


post signature

Thursday, April 24, 2014

How to add embellishments on regular picture frames


 I am the girl who keeps several picture frames in her garage at a time, just waiting for the next project. Whenever I go bargain hunting, I'm always looking for the most ornate, embellished picture frames I can. But those can be costly and often difficult to find. So I came up with a solution of  how to add embellishments on regular picture frames. And I'd like to share it with you today as a part of the Dollar Store Hacks series.

                   
                              These are the tools you will need to complete this project:


 Step One: spray paint the frame the color you want. Make sure to use several coats until it's completely covered. I chose white to create a more shabby look for my frame. Step Two: lay the beads on a flat surface and cover them with the same colored spray paint. You may need 2 cans to fully coat both the frame and the beads. It also may take several coats to cover the metallic colors of the beads.

Step Three: This comes the tricky part. Once both your frame and your beads are completely painted and fully dried, it's time to combine them. Cut the necklaces one time so that it's just a straight line of beads. Match the beads to the side of the very edge of the frame. Place a line of Gorilla Glue along the edge of the frame.  

CAUTION: Working with Gorilla glue can be tricky. Make sure not to get any on your fingers. It dries quickly and it expands when dry so make sure it's placed where it needs to be quickly and that the beads are straight.

Hold firmly for a few minutes. If there are extra beads, you can put them around the corner or cut them off and join them with another strand of beads. Do this until all the corners are covered.


Step Four: By now your beads will completely cover the frame. Any excess glue that is showing you can peel off. I chose the white color because the Gorilla Glue I used dried white and it was easier to hide. If you chose a different color, I would suggest covering the frame in a third coat of spray paint to hide any extra glue.


And there you have it, a much more embellished frame. For more dollar store hacks check out my dollar store hacks label.

Or you can click and save this for later on pinterest.
Follow my blog with Bloglovin
post signature